This tutorial was written on May 27th 2009 by Susan aka Hippiedaze.
The idea for this tag is off my own head lol and any resemblance is purely coincidence.
General Knowledge of psp is required, tutorial was written in psp 9 but will work in other versions.
Supplies Needed
PTU Scrap Kit 'Spellbinding' by Tracey @ Soxsational Scraps, you can purchase this kit from P4S - HERE .
No tubes used.
No Mask Used.
Nice n Easy this one lol so lets get started...
Open a new image in your psp workspace by clicking File, select new, choose 500x500, White background, click ok.
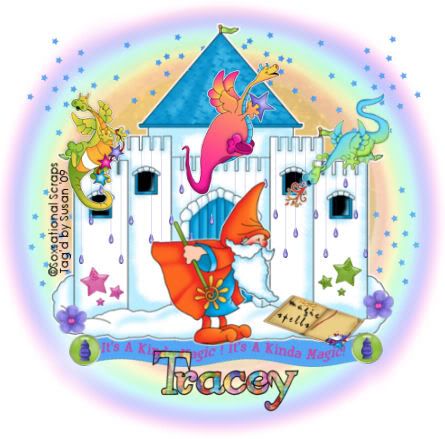
Take the Castle element from the kit and paste as a new layer on your canvas, go to image, select resize, I resized mine by 70%, smartsize and make sure the box that says resize all layers is unchecked, click ok, move the castle up a little on your canvas.
Choose one of the elements named Drops and paste as a new layer on your canvas above the castle layer, go to image, select resize and resize by 50% smartsize, click ok then resize once more by 50%, click ok, place over the castle layer and move to the left, use your eraser tool to erase the bits that are hanging over at the top of the castle, (see mine as example), when happy with this go to layers, select duplicate and then go to image, select mirror, you may need to tidy the top bits on this layer as well.
Activate the bottom white layer, paste the Rainbow from the kit as a new layer and resize to suit your liking, move to top of your canvas and when your happy with it go to layers, select duplicate, go to image, select flip, dupliate this layer and then go to image again, select rotate, free rotate and choose 90 degrees left, go back to layers, select duplicate one more time and then image, mirror, you should now have 4 rainbows forming a circle.
Activate the bottom white layer again and then choose a paper from the kit, open this in your psp workspace then minimise for now, grab your eclipse tool from the tool palette, go to colour palette and set foreground to null, click the background fill and choose pattern, find the paper that you minimised in the pattern drop list, select this and then go to your working canvas and draw out a large circle not bigger than the rainbow circle, when happy with this go to layers and select convert to raster layer.
Take one of the Stars 1 or Stars 2 elements from the kit, paste as a new layer above the coloured circle layer you just created, go to image, select resize and choose resize by 50% smartsize, click ok , move this layer to the top left of your canvas so the stars are showing from behind the castle, when happy with placement go to layers and select duplicate, go to image, select mirror so you have the stars on the top right of the canvas.
Take the element named 'its a kind of magic' ribbon, paste as a new layer and resize as needed so it fits nicely at the bottom of your castle, choose one of the brads ans paste as a new layer, resize this as needed and place over the 'kind of magic ribbon', duplicate the brad and place the duplicate layer on the other side of the ribbon (see mine as example).
Choose a Wizard from the kit and paste as a new layer, resize as needed and place where you like it. Do the same with a few dragon elements as well, remember if you are resizing by a lot to sharpen the elements.
I also added the spell book element and used the deform tool to make it 'flatter' I added the words 'magic spell' , the choice here is yours.
Add any other elements from the kit that you wish, resize as needed and place where you like them.
Crop & resize your tag now if you wish.
Add your name, I used a paper from the kit as my font fill.
Add artist info and copyright info.
Save as jpeg or .png. and we're done lol.
Thanks for trying my tutorial and i hope you enjoyed it would love to see your results, hippiedaze@hotmail.com
Thursday, 28 May 2009
A Kinda Magic
Posted by hippiedaze at 11:45
Labels: Tutorials - PTU
Subscribe to:
Post Comments (Atom)


0 comments:
Post a Comment