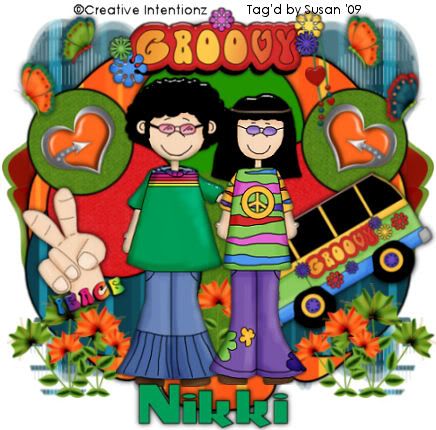
This tutorial was written on May 14th 2009 by Susan aka Hippiedaze.
The idea for this tag is off my own head lol and any resemblance is purely coincidence.
General Knowledge of psp is required, tutorial was written in psp 9 but will work in other versions.
Supplies Needed
PTU Scrap Kit' Groovylicious' by Nikki @ Creative Intentionz and you can purchace this kit by visiting Paradise 4 Scrappers - HERE.
Template Used - #38 bu Lou @ Simply Devilish Scrapz - HERE .
Mask Used - WSL Mask #79 by Chelle @ Wee Scots Lass Creationz - HERE .
Plugin Used - Eye Candy 4000, Gradient Glow.
Preset Shape Used - Flower 5.
Font of Choice.
(Save Mask into psp folder before you start & check you have the flower 5 preset shape)
Lets Begin
Open the template, hit shift & d on your keyboard,this pastes the template as new image, close the original template. Delete info layer, go to image, select resize, choose 80%, choose smartsize & make sure resize all layers is checked, click ok. Now click on the bottom backing layer, go to layers again and select canvas size, choose 500x500, click ok. this will give you a little extra room to work.
Activate Circle 1 layer, go to selections, select all, select float, select defloat then paste a paper of your choice from the kit as a new layer, go to selections, select invert then hit delete on your keyboard, selections again, select none. Now you can delete the original layer.
Repeat that step on ALL Circle layers of the template using different papers. You can delete all the original layers as you go along.
Still on one of the circle layers, go to effects, select eye candy 4000, gradient glow and use the following settings :-
Glow Width - 3.00 .... Soft Corners - 25 .... Overall Opacitiy - 100 .... Setting - Fat .... Colour - Black .
Add this gradient glow to all the circle layers you created.
Open a paper of your choice from the kit in your psp workspace, minimise it for now.
Go to your colour palette and choose black as your foreground colour, line width 3, and for the background click the tab and choose pattern on the box that pops up, look for the paper you minimised in the tabs, check the angle tab to zero and Scale tab to 90, click ok.
Now go to file, select new, choose 500x500 transparent image, click ok.
Go to your tool palette and select preset shape tool, select flower 5 from your preset shapes, this is a standard shape thats included with psp im sure, go to your new image and drag your mouse over the canvas to draw out a large flower, once happy with it, select layers and choose convert to raster layer, now select copy and paste the shape onto your template canvas, move all the way to the bottom just above the backing layer, grab your deform tool and strect it out top bottom and sides if you need to.
Activate the bottom backing layer now and paste a paper of choice from the kit as a new layer, go to layers, load mask from disk and find the mask we loaded at the start (WSL #79), settings should be as follows ...
Fit to canvas - checked .... Source luminace - checked .... Invert transparency - unchecked .... Hide Mask - checked.
go to layers, merge group, grab your deform tool and pull the middle nodes in from the right, move to just around the centre of your tag, move this to the left hand side, go to layers, duplicate layer, go to image, select mirror and reposition the right hand side mask if needed .
Back to your top layer now.
Choose 2 of the little hippy characters from the kit and paste each as a new layer, side by side on the top of your canvas, you may have to resize them a little, i choose to resize by 85%, bicubic, click ok.
Take the 'groovy' word element from the kit, paste as a new layer, resize by 80%, smartsize, all layers unchecked and move to top centre of your tag.
Take a Flower element from the kit and paste as a new layer, dont resize, move layer down to just above the mask layers and move to the left side of your tag so its showing from behind the large shape you created earlier, when happy with placement, go to layers, select duplicate, go to image, select mirror.
Use any other elements you wish from the kit to decorate how you like it or use mine as an example.
Crop or resize your tag now if needed, mine didnt need much cropping.
Add your name, artist info and copyright info.
Save as jpeg or .png.
And I think thats us done, lol. Thanks for trying my tutorial and i hope you enjoyed it would love to see your results,
Thursday, 14 May 2009
Groovy Dayz
Posted by hippiedaze at 16:30
Labels: Tutorials - PTU
Subscribe to:
Post Comments (Atom)


0 comments:
Post a Comment