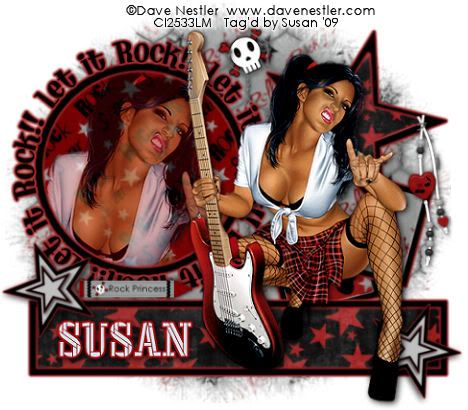
This tutorial was written on May 28th 2009 by Susan aka Hippiedaze.
The idea for this tag is off my own head lol and any resemblance is purely coincidence.
General Knowledge of psp is required, tutorial was written in psp 9 but will work in other versions.
Supplies Needed
Tube of Choice, I used the artwork of Dave Nestler, you must have a proper license to use his work please visit CILM - HERE .
FTU Scrap Kit 'Rock Revolution' by Kirstin @ Kirstin's Wicked Scraps - HERE .
Template Used - Template #52 by Beth @ Blissfully Beth - HERE .
Mask of Choice.
Plugin Used - Eye Candy 4000, Gradient Glow.
Preset Shape Used - Basic Star. (optional).
Font of Choice.
(open all supplies and place mask into your psp folder before we start)
Lets Get Started
Open the template, hit shift & d on your keyboard, this pastes the template as new image, close the original template. Delete info layer, go to image, select resize and choose resize by 78%, smartsize and make sure resize all layers tab is checked, click ok.
Activate the Small Square 2 layer, grab your magic wand from the tool palette and click inside the grey area of the square so you have the marching ants blinking, paste a paper of choice from the kit as a new layer and resize a little if needed, once your happy with that go to selections, select invert then hit delete on your keyboard, this will remove the excess paper, go to selections again and select none.
Go to effects, select eye candy 4000, gradient glow and use the following settings :-
Glow Width - 3.00 .... Soft Corners - 25 .... Overall Opacitiy - 100 .... Colour - Red. Click ok.
Repeat the same step for the layers named Square 1 & Star. Use different papers and add the same gradient glow to both layers.
Activate the Circle Bg layer, go to selection, select all, select float, select defloat then paste your tube as a new layer, resize this a little if you want to, position how you want it inside the circle and when your happy with placement go to selections, select invert then hit delete on your keyboard, do not deselect yet, now activate the Circle Bg layer again and paste a paper of your choice from the kit as a new layer, resize if needed and then hit delete on your keyboard, your paper should be behind the tube layer, go to selections and select none. Delete the original layer, click on the tube layer, go to layer properties and lower the opacity to around 68, this will make the paper blend with the tube, (see mine as example).
I left the Circle Frame & Wordart layers black but added the gradient glow with the same settings & colour as before.
Activate the Rectangle Background layer and go to selection, select all, select float, select defloat then paste a paper of your choice as a new layer, resize a little and when happy go to selections, select invert then hit delete on the keyboard. Delete the original layer.
On the Rectangle Frame layer, I left this black and added the gradient glow as before.
Activate the bottom white layer and paste a paper of choice as a new layer, go to layers, select load mask from disc and find the mask that you saved at the start, use the following settings :- Fit to canvas - checked .... Source luminace - checked .... Invert transparency - unchecked.... Hide Mask - checked. Click ok, go to layers, merge group.
Now paste the barbed wired mesh element as a new layer, resize down till its fitting nicely with your mask layer, position in centre of the canvas.
Activate the top layer now and paste your main tube as a new layer, resize to your liking and add a dropshadow, place where you want it.
Add any elements from the kit, resize as needed and place where you like them around the tag.
I also drew out a couple of stars from the preset shapes and coloured to match my tag, the choice is yours here.
Crop or resize your tag if you want to to your preffered size in the usual way. I resized at start but cropped a little at this point.
Add your name, I choose white for my background colour and null for foreground on the font layer, add the gradient glow to your name with following settings :-
Glow Width - 3.00 .... Soft Corners - 25 .... Overall Opacitiy - 100 .... Colour - Red.
Add artist info & copyright info.
Save as jpeg or .png. and we're done lol.
Thanks for trying my tutorial and i hope you enjoyed it would love to see your results,
hippiedaze@hotmail.com
Wednesday, 10 June 2009
Lets Rock It
Posted by hippiedaze at 07:49
Labels: Tutorials - FTU
Subscribe to:
Post Comments (Atom)


0 comments:
Post a Comment