This tutorial was written on June 21st 2009 by Susan aka Hippiedaze.
The idea for this tag is off my own head lol and any resemblance is purely coincidence.
General Knowledge of psp is required, tutorial was written in psp 9 but will work in other versions.
Supplies Needed
Tube of Choice, I used the artwork of Lix, you must have a proper license to use his work please visit CILM - HERE .
Scrap Kit Used - 'Jungle Fever' by Tracey @ Soxsational Scrapz, you can purchase this awesome kit from P4S - HERE .
No Template Used.
2 Masks of Choice.
Font of Choice.
(open all supplies and save mask to psp folder before beginning)
Lets Start ....
Go to file in your psp tabs, select new and choose a white image whichever size you prefer to work with, i use 500x500 but select yours to suit yourself, click ok.
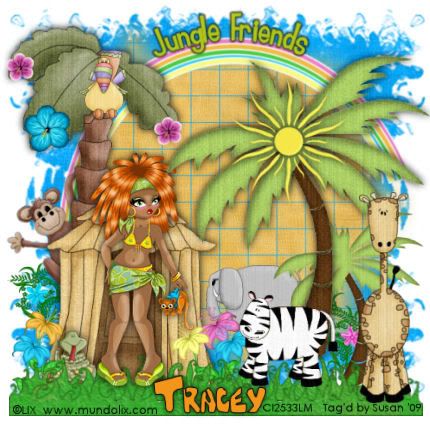
Take the hut element from the kit and paste as a new layer, resize this whichever size suits and remember resize by smartsize, make sure resize all layers is unchecked and click ok, move the hut to the left of your canvas and add a small dropshadow.
Take the grass 2 element and paste this as a new layer, resize as needed and move down to bottom of your canvas, i dulicated the grass and moved the duplicate layer down slightly to make the grass look thicker.
Take the palm tree element from the kit, paste as a new layer and resize to your liking, move to the right side of your canvas, then go to layers, select duplicate and then go to image, select resize, i resized the 2nd tree around 75%, smartsize, click ok, add a dropshadow to both tree layers.
Take the sun element from the kit, paste as a new layer and resize as needed, place this on top of the large tree layer and position in the middle (see mine), add the dropshadow to this layer.
Paste the rainbow element from the kit as a new layer and resize as needed, move this layer down to the very bottom layer of your canvas and postion, i rotated mine very slightly so the trees were covering the edges of the rainbow.
Grab your eclipse tool from the tool palette and check background colour tab to null, any colour will do for the foreground as it will be deleted later, draw out a largish circle in line with the top of the rainbow, now take your text tool and choose a font & size, check your text to floating selection, choose a colour for the foreground & background and then move your mouse over the circle till you see a text icon with a lil half moon shape beside it, click to enter your choosen text, i choose 'Jungle Friends', click apply, the marching ants will be blinking around the text now, go to layers, select new raster layer, click ok, move the new raster layer to under the floating selection layer, now activate the floating selection and go to selections, select none, the text should now be on its own layer, delete the circle layer & postition the text above the rainbow like mine.
Choose some animals from the kit and paste each as a new layer, resize layers as needed and add a dropshadow to each animal, place around your tag where you like.
Take your tube and paste as a new layer, resize as neede and add a dropshadow, place where you like it, i put mine in front of the lil hut lol.
Take some flower elements and paste each as a new layer, resize quite a bit and place each flower along the grass at the bottom, move the layers behind the grass if you want to. I also put a few flowers in the tree.
Activate the bottom white layer and paste a paper of choice from the kit as a new layer, resize a little if needed, go to layer, select load mask from disk and find the first mask you choose at the start, I choose an edge mask for this one, make sure the following settings are checked :-
Fit to canvas - checked Source luminace - checked Invert transparency - unchecked .... Hide Mask - checked. go to layers, merge group & you can use the deform tool to resize to suit your tag.
Now take another paper from the kit and paste as a new layer, resize a little if needed, go to layer, select load mask from disk and find the 2nd mask you choose at the start, use the same settings as above and after merging group, fit to suit your tag.
Activate the top layer now and add any other elements from the kit that you want.
Now crop or resize if you want to.
Add your name, add artist info and copyright info.
Save as jpeg or .png.
and we're done i think lol.
Thanks for trying my tutorial and i hope you enjoyed it
would love to see your results,
hippiedaze@hotmail.com
Tuesday, 23 June 2009
Jungle Friends
Posted by hippiedaze at 02:30
Labels: Tutorials - PTU
Subscribe to:
Post Comments (Atom)


0 comments:
Post a Comment