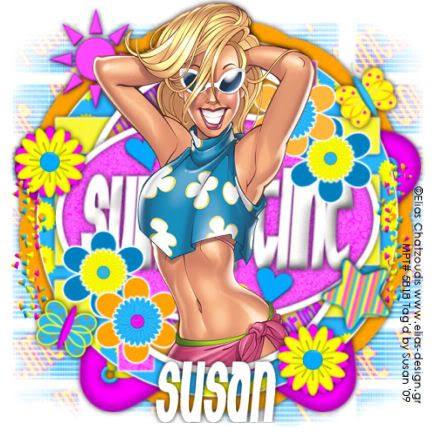
This tutorial was written on June 28th 2009 by Susan aka Hippiedaze.
The idea for this tag is off my own head lol and any resemblance is purely coincidence.
General Knowledge of psp is required, tutorial was written in psp 9 but will work in other versions.
Supplies Needed
Tube of Choice I used the artwork of Elias Chatzoudis, you will need a proper license to use his work, pls visit MPT - HERE.
PTU Scrap Kit Used - 'Summertime Brights' by Susan aka Hippiedaze (me), you can purchase this kit from P4S - HERE.
Template Used - Hippiedaze Template #20 by Susan aka Hippiedaze (me) - HERE.
Mask Used - Bfly Flby Mask #32 @ Butterfly Flutterby Creations - HERE.
Plugin Used - Eye Candy 4000, Gradient Glow.
Font of Choice.
(open all supplies and save mask to your psp folder before beginning)
Lets Start ....
Open your template, hit shift & d on the keyboard to duplicate, now you can close the original template.
Delete info layer.
I resized here, go to image, resize and make sure resize all layers is checked, resize by around 90% smartsize and check the box that says resize all layers, click ok. (This depends on the size you like your tags).
Activate the bottom white layer and go to image,select canvas size and choose 500x500, click ok, if you have any transparent image showing grab your floodfill tool and fill with white.
Activate the large circle layer, go to selections, select all, select float, select defloat and paste paper of choice as a new layer, resize it till your happy with it then selections, invert & hit delete on the keyboard, selections, select none. Delete the original layer now.
Go to effects, select eye candy 4000, gradient glow and use the following settings :-
Glow Width - 3.00 .... Soft Corners - 25 .... Overall Opacity - 100 .... Colour - White, move the slider to about half way along to the middle, click ok.
Add a small dropshadow to the layer.
Repeat the step on the layers named horizontal slats, vertical slats, black oval & grey oval & white oval part, use different papers for each layer and delete the original layers as you go along.
Add the same gradient glow & drop shadow to each new layer you created.
I didnt use the white oval part layer in this tag so if your following mine just delete this layer.
Activate the oval frame 1 layer, go to adjust, select brightness/contrast and move the brightness slider all the way to the right (255) this will change the frame to white, click ok then add the dropshadow.
Repeat that step for the oval 2 layer.
For all 4 flower layers, i colourised by going to adjust, choose hue/saturation/lightness, choose colourise and pick a nice bright colour to match the rest of your tag, add the gradient glow to these 4 layers also the dropshadow.
Activate the bottom white layer, paste a paper from the pack as a new layer, go to layers, select load mask from disc and use the mask that you saved at the start (Bfly Flby Mask #32), use the following settings :-
Fit to canvas - checked .... Source luminace - checked .... Invert transparency - unchecked .... Hide Mask - checked, click ok, go to layers, merge group.
Take one of the round frames from the kit and paste as a new layer just above your mask layer, resize as needed till its just showing from behind the circle layer (see mine), add the dropshodow to this layer but not the gradient glow.
I also added one of the star frame elements, resize as needed till it sits how you like it, add the dropshadow to this layer too.
Activate the centre oval layer you created, take one of the wordart layers and paste as a new layer, resize as needed so it fits nicely inside the oval, you can leave this layer coloured or if your following mine then go to adjust, select brightness/contrast and move the brightness slider all the way to the right (255) now the words will be white, go to effects, select 3d effects, inner bevel and use the following settings :-
Bevel Style - 4 .... Width - 5 .... Smoothness - 49 .... Depth - 5 .... Ambience - 0 .... Shininess - 0 .... Colour - White .... Angle - 332 .... Intensity - 50 .... Elevation - 30 . click ok.
Add the dropshadow to this layer.
Now take your tube and paste as a new layer, resize a little if needed and place where you like it within the circle, once happy with placement go to layers, select duplicate and move the duplicate layer down to the layer above the vertical oval, click back to the top tube layer and grab your eraser tool to eraser any tube bits that are hanging over the frame, add the dropshadow to the BOTTOM tube layer not the top one.
Take some flower elements & any other elements from the kit and paste each as a new layer, resize as needed and place where you like them to decorate your tag, i added the gradient glow to most element layers and the dropshadow, this is up to you.
Once you finish decorating your tag crop or resize if you didnt at the start.
Add your name, artist info & copyright.
Save as jpeg or .png.
And I think thats us about done.
Thanks for trying my tutorial and i hope you enjoyed it
would love to see your results,
hippiedaze@hotmail.com
Friday, 3 July 2009
Bright Summertime
Posted by hippiedaze at 18:53
Labels: Tutorials - PTU
Subscribe to:
Post Comments (Atom)


0 comments:
Post a Comment