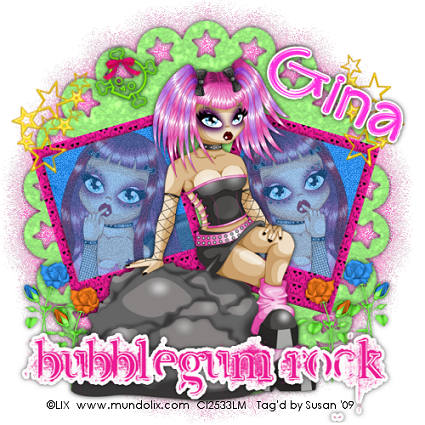
This tutorial was written on August 13th 2009 by Susan aka Hippiedaze.
The idea for this tag is off my own head lol and any resemblance is purely coincidence.
General Knowledge of psp is required, tutorial was written in psp 9 but will work in other versions.
Supplies Needed
Tube of Choice, I used the artwork of Lix, you must have a proper license to use his work please visit CILM - HERE .
Scrap Kit Used - 'Bubblegum Rock' by Gina @ , you can purchase this awesome kit from HERE.
No Templates Used.
No Masks Used.
Plugin Used - Eye Candy 4000, Gradient Glow.
2nd Plugin Used - Toadies, Blast n Blur.
Font of Choice.
Open all supplies before you start ....
Lets Get Started....
Open a new image in your psp by going to file tab and select new, choose 500x500 white image, click ok.
Take one of the mat elements and paste as a new layer in the centre of your canvas, resize around 85% smartsize, make sure resize all layers is unchecked then click ok.
Duplicate this layer and go to adjust, select hue/saturation/brightness and then choose a colour to match your tube/tag, click ok then go to effects, choose Toadies, blast n blur and use the default settings, click ok and move this layer below the first mat layer.
Take one of the frames from the kit and paste as a new layer, go to image, select rotate and rotate by around 20.00 left, duplicate this layer and then go to image and select mirror, position to your liking or see mine as example.
Grab your magic wand and click inside the frame area so the marching ants are blinking, go to selections, select modify and choose to expand by 2, click ok take a paper of choice from the kit and paste as a new layer, resize a little then go to selections again and select invert then hit delete on your keyboard, do not deselect yet, choose a tube and paste this as a new layer, resize a little then position how you like it inside the frame, when happy with placement simply hit delete on your keyboard to erase excess tube from around the frame.
Repeat that step for the other frame using the same tube mirrored or a different tube if you wish as long as its by the same artist.
On both tube layers i lowered the opacity down to around 60 but this is up to you. I also added some noise to both paper layers.
Take your main tube and make sure your on top layer of your canvas then paste tube as a new layer, resize as needed to your liking and place in middle of your canvas.
Take the bubblegum rock wordart from the kit and paste as a new layer, resize as needed and place at bottom of your canvas or where you like depending on what tube you use.
Add any elements you want to decorate your tag, or see mine as examples. I used some roses, stars and skull.
Add a drop shadow to any layers you wish.
Crop or resize your tag now if you want to but leave enough room for your name.
Add your name, artist info and copyright info.
Save as jpeg or .png.
Thanks for trying my tutorial and i hope you enjoyed it
would love to see your results,
hippiedaze@hotmail.com .
Thursday, 13 August 2009
Bubblegum Rock
Posted by hippiedaze at 07:07
Labels: Tutorials - PTU
Subscribe to:
Post Comments (Atom)


0 comments:
Post a Comment