Download - HERE.
Sunday, 5 July 2009

Rocker Chic
This tutorial was written on June 28th 2009 by Susan aka Hippiedaze.
The idea for this tag is off my own head lol and any resemblance is purely coincidence.
General Knowledge of psp is required, tutorial was written in psp 9 but will work in other versions.
Supplies Needed
Tube of Choice I used the artwork of Ismael Rac, this artist has moved from MPT to Artistic Minds Inc, my tag has an MPT license from where I bought it but you can get Ismaels awesome tubes from AMI - HERE.
PTU Scrap Kit 'Punk Rock Chic' by Susan aka Hippiedaze (me), this kit can be purchased from P4S - HERE.
No Template Used.
Masks Used - Bfly Flby Mask #9 & Bfly Flby Mask #67 by Butterfly Flutterby Creations - HERE.
Font of Choice, I used Egbert.
(open all supplies and save both masks to your psp folder before beginning)
Lets Start ....
Go to file and select new, choose white canvas, 500x500, click ok.
We will start this one with adding the mask layer first, choose a paper of choice from the kit and paste as a new layer on your canvas, go to layers, select load mask from disc and look for the mask that you saved at the start (Bfly Flby Mask #67) and use the following settings :-
Fit to canvas - checked .... Source luminace - checked .... Invert transparency - unchecked .... Hide Mask - checked, click ok, go to layers, merge group & you can use the deform tool to resize to suit yourself, i didnt need to do much deforming on this one.
Take a drum element from the kit and paste as a new layer, place in centre of your canvas & mask layer and resize as needed, depending on what size you make your tags, add a dropshadow to this layer.
Activate your bottom white layer and grab the eclipse tool from the tool palette, set your foreground colour tab to null and in your background colour tab choose a colour or you can use a paper from the kit as your fill (the paper should be open and minimised in your psp workspace for it to show in the patterns tab), now draw out a lage circle around the same size as the inner ring on the mask layer, when happy with size go to layers and choose convert to raster layer.
Choose a tube for your background, I used the close up of my main tube, paste tube as a new layer, resize as needed and place how you want it, mines in the centre of the circle and mask layers, go to layer properties and lower the opacity of the tube layer to around 50.
Activate the bottom white layer now and paste a paper from the kit as a new layer, resize this a bit but not smaller than the canvas, go to layers, select load mask from disc and find the 2nd mask you saved at the start (Bfly Flby Mask #9) use the following settings :-
Fit to canvas - checked .... Source luminace - checked .... Invert transparency - unchecked .... Hide Mask - checked
go to layers, merge group & you can use the deform tool to resize to suit your tag. I simple stretched it out a bit so that it was showing from behind all other layers.
Activate the top layer of your canvas and paste your main tube as a new layer, resize if needed and place where you want it on your tag, add a dropshadow to the main tube.
Take the rock pass element and paste as a new layer, resize as needed, take your deform tool and rotate it slightly, move up to the guitar on the mak layer and then take your eraser tool to erase a little of the ribbon to make it look like its hanging over the guitar, add a dropshadow to the layer.
Take any other elements from the kit, decorate how you wish, paste all elements on new layers, resize elements as needed and place where you like them, add a dropshadow or add the gradient glow to each element layer.
Now crop & resize your tag if you wish to if you didnt at the start.
Add your name, for my name i used text on a circle, to do this grab your eclipse tool and set foreground colour to anything, it wont matter lol it will be deleted later, make sure background colour tab is set to null, now draw out circle on your canvas in line with the top of the mask layer, take your text tool and move mouse over the circle till you see a little half moon shape with the text icon, when you see this click it and type your name, it should be on the circle lol, before you click apply make sure you set the text to floating selection, click ok and yourname should be on the curve with marching ants around it, go to layers, select add new raster layer then click ok and move this layer below the floating layer, now click back to the floating layer and go to selections, select none, move your text a little till its how you like it on the circle, go to effects, select 3d effects, inner bevel and use the following settings :-
Bevel Style - 4 .... Width - 5 .... Smoothness - 49 .... Depth - 5 .... Ambience - 0 .... Shininess - 0 .... Colour - White .... Angle - 332 .... Intensity - 50 .... Elevation - 30 . click ok.
Add artist info & copyright.
Save as jpeg or .png.
And I think thats us about done.
Thanks for trying my tutorial and i hope you enjoyed it
would love to see your results,
hippiedaze@hotmail.com

Punk Rock
This tutorial was written on June 28th 2009 by Susan aka Hippiedaze.
The idea for this tag is off my own head lol and any resemblance is purely coincidence.
General Knowledge of psp is required, tutorial was written in psp 9 but will work in other versions.
Supplies Needed
Tube of Choice I used the artwork of Popeye Wong, this artwork is FTU and you can grab Popeye's awesome tubes from - HERE .
PTU Scrap Kit 'Punk Rock Chic' by Susan aka Hippiedaze (me), this kit can be purchased from P4S - HERE.
Template Used - Hippiedaze Template #24 by Susan aka Hippiedaze (me) - HERE.
Mask Used - WSL Mask #254 by Chelle @ Wee Scots Lass Creations - HERE.
Plugin Used - Eye Candy 4000, Gradient Glow.
Font of Choice, I used Egbert.
(open all supplies and save mask to psp folder before beginning)
Lets Start ....
Open the template, hit shift & d on your keyboard,this pastes the template as new image, close the original template. Delete info layer, go to image, select resize, choose resize 80%, choose smartsize and make sure the box resize all layers is checked, click on the bottom white layer, go to image again and select canvas size and choose 500x500 to give a little extra room to work or if you prefer you can resize later.
Activate the layer named big circle, go to selections tab, select all, select float, select defloat then paste a paper from the kit as a new layer, resize this a little, i resized by 80% smartsize, when happy with size go to selections and select invert then hit delete on your keyboard, go to selections again and select none then delete the original circle layer.
Repeat that step on the layer named centre circle & rectangle layer, use different papers for each layer and delete the original layers as you work.
Again repeat step on the frame layers (big circle frame, small circle frame & rectangle frame), use different papers and delete the originals, now on each frame layer we will add a gradient glow, do this by going to effects tab, select eye candy 4000, gradient glow and use the following settings :-
Glow Width - 3.00 .... Soft Corners - 25 .... Overall Opacitiy - 100 .... Colour - Black, Click ok.
Colourise the skull layer by going to adjust, select hue/saturation/lightness and then choose colourise, pick a colour that matches your tube/tag, click ok.
Activate the Punk Rock wordart layer and you can either colourise this in the same way as the skull layer or go to selections, select all, select float, select defloat then paste a paper from the kit as a new layer, resize a little if needed then go to selections and select invert then hit delete on the keyboard, selections, select none, add the same gradient glow as before to the wordart layer.
I decided not to use the stars layer for this tag but this is up to you, either colourise or use a paper in the same way as above.
Activate the bottom white layer now and paste a paper from the kit as a new layer, resize this a bit but not smaller than the canvas, go to layers, select load mask from disc and find the mask you saved at the start (WSL Mask #254) use the following settings :-
Fit to canvas - checked .... Source luminace - checked .... Invert transparency - unchecked .... Hide Mask - checked
go to layers, merge group & you can use the deform tool to resize to suit your tag. I simple stretched it out a bit.
Back to your top layer now and paste your tube as a new layer, resize a little and place where you want it, add a dropshadow to the tube.
Choose any other elements from the kit, decorate how you wish, resize elements as needed and place where you like them, add a dropshadow or add the gradient glow to each element layer.
Now crop & resize your tag if you wish to if you didnt at the start.
Add your name, artist info & copyright.
Save as jpeg or .png.
And I think thats us about done.
Thanks for trying my tutorial and i hope you enjoyed it
would love to see your results,
hippiedaze@hotmail.com

Saturday, 4 July 2009
2 New Tuts coming Tomorrow
Heres a sneak peek at 2 new tuts I wrote with my new Punk Rocker Chic Scrap Kit, will post both tuts tomorrow, this kit is mega sized and if you run over to Paradise 4 Scrappers store you can pick this kit up for only $1.50, store wide sale means 50% almost everything, so go on grab your self a bargain but remember sale is only for the weekend and the kit will be $3.00 after tomorrow night
sooo heres the previews for you, give you an idea of what you can do with these 93 different elements and 53 paper
Enjoy
Friday, 3 July 2009
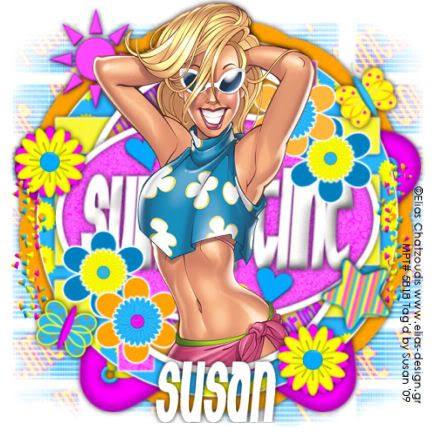
Bright Summertime
This tutorial was written on June 28th 2009 by Susan aka Hippiedaze.
The idea for this tag is off my own head lol and any resemblance is purely coincidence.
General Knowledge of psp is required, tutorial was written in psp 9 but will work in other versions.
Supplies Needed
Tube of Choice I used the artwork of Elias Chatzoudis, you will need a proper license to use his work, pls visit MPT - HERE.
PTU Scrap Kit Used - 'Summertime Brights' by Susan aka Hippiedaze (me), you can purchase this kit from P4S - HERE.
Template Used - Hippiedaze Template #20 by Susan aka Hippiedaze (me) - HERE.
Mask Used - Bfly Flby Mask #32 @ Butterfly Flutterby Creations - HERE.
Plugin Used - Eye Candy 4000, Gradient Glow.
Font of Choice.
(open all supplies and save mask to your psp folder before beginning)
Lets Start ....
Open your template, hit shift & d on the keyboard to duplicate, now you can close the original template.
Delete info layer.
I resized here, go to image, resize and make sure resize all layers is checked, resize by around 90% smartsize and check the box that says resize all layers, click ok. (This depends on the size you like your tags).
Activate the bottom white layer and go to image,select canvas size and choose 500x500, click ok, if you have any transparent image showing grab your floodfill tool and fill with white.
Activate the large circle layer, go to selections, select all, select float, select defloat and paste paper of choice as a new layer, resize it till your happy with it then selections, invert & hit delete on the keyboard, selections, select none. Delete the original layer now.
Go to effects, select eye candy 4000, gradient glow and use the following settings :-
Glow Width - 3.00 .... Soft Corners - 25 .... Overall Opacity - 100 .... Colour - White, move the slider to about half way along to the middle, click ok.
Add a small dropshadow to the layer.
Repeat the step on the layers named horizontal slats, vertical slats, black oval & grey oval & white oval part, use different papers for each layer and delete the original layers as you go along.
Add the same gradient glow & drop shadow to each new layer you created.
I didnt use the white oval part layer in this tag so if your following mine just delete this layer.
Activate the oval frame 1 layer, go to adjust, select brightness/contrast and move the brightness slider all the way to the right (255) this will change the frame to white, click ok then add the dropshadow.
Repeat that step for the oval 2 layer.
For all 4 flower layers, i colourised by going to adjust, choose hue/saturation/lightness, choose colourise and pick a nice bright colour to match the rest of your tag, add the gradient glow to these 4 layers also the dropshadow.
Activate the bottom white layer, paste a paper from the pack as a new layer, go to layers, select load mask from disc and use the mask that you saved at the start (Bfly Flby Mask #32), use the following settings :-
Fit to canvas - checked .... Source luminace - checked .... Invert transparency - unchecked .... Hide Mask - checked, click ok, go to layers, merge group.
Take one of the round frames from the kit and paste as a new layer just above your mask layer, resize as needed till its just showing from behind the circle layer (see mine), add the dropshodow to this layer but not the gradient glow.
I also added one of the star frame elements, resize as needed till it sits how you like it, add the dropshadow to this layer too.
Activate the centre oval layer you created, take one of the wordart layers and paste as a new layer, resize as needed so it fits nicely inside the oval, you can leave this layer coloured or if your following mine then go to adjust, select brightness/contrast and move the brightness slider all the way to the right (255) now the words will be white, go to effects, select 3d effects, inner bevel and use the following settings :-
Bevel Style - 4 .... Width - 5 .... Smoothness - 49 .... Depth - 5 .... Ambience - 0 .... Shininess - 0 .... Colour - White .... Angle - 332 .... Intensity - 50 .... Elevation - 30 . click ok.
Add the dropshadow to this layer.
Now take your tube and paste as a new layer, resize a little if needed and place where you like it within the circle, once happy with placement go to layers, select duplicate and move the duplicate layer down to the layer above the vertical oval, click back to the top tube layer and grab your eraser tool to eraser any tube bits that are hanging over the frame, add the dropshadow to the BOTTOM tube layer not the top one.
Take some flower elements & any other elements from the kit and paste each as a new layer, resize as needed and place where you like them to decorate your tag, i added the gradient glow to most element layers and the dropshadow, this is up to you.
Once you finish decorating your tag crop or resize if you didnt at the start.
Add your name, artist info & copyright.
Save as jpeg or .png.
And I think thats us about done.
Thanks for trying my tutorial and i hope you enjoyed it
would love to see your results,
hippiedaze@hotmail.com
July 4th Storewide Sale

Hurry on Over to the store for 50% off Storewide
You will be spoilt for choice with 100's & 100's of Holiday Weekend bargains.
Plus lol my first PTU Scrap Kit is on sale for the very first time and is a steal at only $1.50 half the normal selling price (will normally be $3.00)
Am so happy to become a part of the designing team over there as well as CT and no better time to be joining than right at the start of a mega sale
Simply click on the sale banner above to go to the store and start your sale shopping
Thursday, 2 July 2009
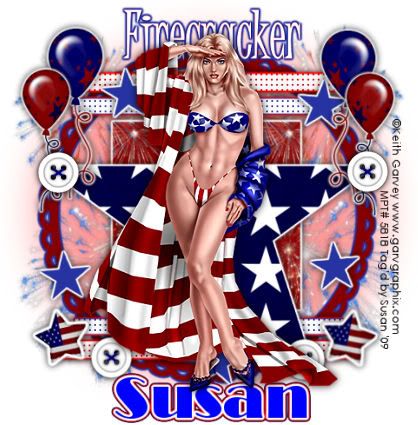
July 4th Firecracker
This tutorial was written on June 19th 2009 by Susan aka Hippiedaze.
The idea for this tag is off my own head lol and any resemblance is purely coincidence.
General Knowledge of psp is required, tutorial was written in psp 9 but will work in other versions.
Supplies Needed
Tube of Choice, I used the artwork of Keith Garvey, you must have a proper license to use his work please visit MPT, mypsptubes - HERE .
FTU Scrap Kit '4th July' by Nichole @ Envied & Admired - HERE .
Template Used - Independance by Gothic Realm - HERE .
No Mask Used.
Plugin Used - Eye Candy 4000, Gradient Glow.
Effects Used - Textured Effects, Weave.
(Open all supplies and save mask to psp folder before you begin)
Lets Get Started
Open the template, hit shift & d on your keyboard,this pastes the template as new image, close the original template. Delete the info layer.
Go to image and choose resize, select width & height to 80%, smartsize checked and make sure the tab resize all layers is checked, click ok.
Activate the bottom white layer, go to image, select canvas size and choose 500x500, click ok, if you get any transparent image showing grab your floodfill tool and fill with white.
Whether you resize here or at the end is up to you, i just find it easiest working this size.
Activate the Square layer, go to selections, select all, select float, select defloat then paste a paper from the kit as a new layer, resize a bit if needed then go to selections and select invert then hit delete on your keyboard, go back to selections and select none, delete the original layer and on the layer you just created go to effects, select eye candy 4000, gradient glow and use the following settings :-
Glow Width - 3.00 .... Soft Corners - 25 .... Overall Opacity - 100 .... Colour - White ... move the colour slider half way along to the centre to give a bolder glow effect. click ok.
Repeat that step on the layers named Star and Stars, use different papers and delete the original layers.
Activate the Large Rectangles layer, go to adjust, select brightness/contrast and move the brightness slider all the way to the right (255) the rectangles will now be white, click ok, go to effects, select textured effects, weave and use the following settings :-
Gap Size - 2 .... Width - 4 .... Opacity - 2 .... Weave & Gap Colours - #ff0000 .... Fill Gaps - Checked. Click ok, now go to effects again and select eye candy 4000, gradient glow, add the same glow as before but change the colour to #ff0000.
Repeat that step for the Small Rectangles layer but this time change the colour of the weave to #2f3bae and also the glow colour to #2f3bae.
Activate the wordart layer, i left this white and added a gradient glow with 2 different colours to this layer, to do this go to the gradient glow effect, on the first colour slider select #ff0000, click to add a 2nd slider and use #2f3bae, move your sliders to where you want them to determine ho bold the glow will be then click ok and move this layer to the top of your tag.
Activate the bottom white layer, take one of the firework elements from the kit and paste as a new layer, resize a bit to your liking then move the element to the left of your tag, when happy with psoition and size go to layers, select duplicate then go to image and select mirror so you now have fireworks on both sides.
Take one of the frame elements from the kit and paste as a new layer, resize till its sitting nicely around the other template layers, see mine as example, go to effects and choose eye candy 4000, gradient glow, use the following settings to add a glow to the frame :-
Glow Width - 3.00 .... Soft Corners - 25 .... Overall Opacity - 100 .... Colour - #2f3bae ... move the colour slider half way along to the centre to give a bolder glow effect. click ok.
Activate the bottom white layer again and grab your eclipse tool from the tool palette, in your colour palette set the foreground to null and background to a colour of your choice, now draw out a large circle just a little bigger than the frame, go to adjust, select blur, choose guassian blur and set to 20.00, click ok.
On the top layer of your canvas now, paste your tube as a new layer, resize as needed and place where you want it, add a dropshadow.
Add any other elements from the kit, i added a few balloons, buttons & stars but the choice is yours here, place each element as a new layer and resize as needed, add a dropshadow or the gradient glow to your elements.
Now crop or resize your tag in the usual way if you want to.
Add your name, I used the double glow on my name same settings as before
Add artist info and copyright info.
Save as jpeg or .png.
and we're done i think lol.
Thanks for trying my tutorial and i hope you enjoyed it
would love to see your results,
hippiedaze@hotmail.com
Subscribe to:
Posts (Atom)


