To grab these overlays, ipod template & 'one summer day' scrap kit for just $1.00 each in the $1.00 day Tuesday sale over at P4S, be sure to stop by before midnight, just click the blinkie on the right and start shopping
Bed time for me here though its 2am yikes lol
nite everyone
Hugs Susan
Tuesday, 14 July 2009
A Few Hours Left
Summer Beauty
This tutorial was written on July 1st 2009 by Susan aka Hippiedaze.
The idea for this tag is off my own head and any resemblance is purely coincidence.
General Knowledge of psp is required, tutorial was written in psp 9 but will work in other versions.
The tutorial is fairy quick and easy to follow.
Supplies Needed
Tubes of Choice I used the artwork of Elias Chatzoudis, you must have a proper license to use his work please visit MPT, mypsptubes - HERE .
FTU Scrap Kit 'Fruitalicious' by Pink Poetic Scraps - HERE.
Template Used - Template #76 by Melissa @ Melissa's Creations - HERE .
Mask Used - Bfly flby Mask #45 by Butterfly Flutterby Creations - HERE .
Font of Choice.
(Open all supplies and save mask to psp folder before you begin)
Lets Get Started
Open the template, hit shift & d on your keyboard,this pastes the template as new image, close the original template.
I resized all layers by 85% smart size at this point. ( optional, depends what size you like to work with)
Delete info layer, go to layers, add new raster layer, grab your floodfill tool from the tool palete and choose white colour as your foreground then floodfill the new layer, move this all the way down to the bottom of your canvas, while still on white layer, go to layers, select canvas size and select 500x500 so you have a little more room to work, if theres any transparent canvas showing click it with the floodfil tool.
Activate the angled thin rectangle layer, go to selections, select all, select float, select defloat then paste a paper from the kit as a new layer, go image select resize and resize the paper a little if you want to, go to selections again and select invert then hit delete on your keyboard, back to selections and select none, Delete the orginal layer now.
The above step should be repeated on all the template layers except the glitter circle layer so go through all layers and fill with different papers of choice from the kit, delete the original layers as you work.
Ad a dropshadow to All layers you just created.
Activate the glitter circle layer, go to adjust colour to target brush tool, choose a colour of your choice that matches your tube for your foreground colour tool then move your mouse over the circle and it should now be the choosen colour.
Take your tube and place as a new layer in the middle of your canvas & circle, resize a bit if needed and when happy with placement go to layers, select duplicate, move the duplicate layer to below the circle layer then activate the top tube layer and grab your eraser tool to eraser bits of the tube that are hanging over the bottom of the circle, add a dropshadow to the duplicate tube layer and not the top one.
Activate the bottom white layer and paste a paper of choice from the kit as a new layer, go to layers, select load mask from disk and then find the mask that you saved at the start, select this and make sure the following settings are set :-
Fit to canvas - checked .... Source luminace - checked .... Invert transparency - unchecked .... Hide Mask - checked. Click ok. I used the deform tool to pull it out a little from behind the template layers.
Take a doodle of choice from the kit and paste as a new layer on the layer above the mask you just created, move the doodle to the right side of your tag so it shows from behind the template layers just a little, take the deform tool and pull down the bottom nodes to stretch it a bit, when happy with how it looks go to layers, select duplicate then go to image and select mirror, I move this doodle down nearer the bottom of my tag but you can just play with them till they are how you like them.
Take any other elements from the kit that you want to use for decorating your tag, paste each element on a new layer and resize as needed then place where you want them and add a small dropshadow to each element.
Crop and resize now if you wish to.
Add your name, artist info and copyright info.
Save as jpeg or .png.
and we're done lol.
Thanks for trying my tutorial 
would love to see your results,
hippiedaze@hotmail.com

Monday, 13 July 2009
$1.00 Tuesday at P4S
Don't forget to stop by the store tomorrow and pick up a bargain or two lol, hundreds of items listed in $1 Tuesday section of the store.
Look out for a couple of listings from me too hehe, simply click the preview to start shopping tomorrow.
Bed time for me here tonight, will be back in the morning with a new tut, a FTU one.
hugs Susan

Rainbow Rockz Add On Scrap Kit
Using up some left over elements and making some groovy new ones lol so put it all together and came up with this rockin add on kit, smaller than the others but still packed with 42 cute elements & 23 papers (600x600) tagger sized intented & priced at just $2.50.
You can get to the store by clicking the preview.
Any tut writers out there using my kits, I would love to see so pls leave a link in my cbox or drop me an email .
Happy Shopping & Tagging
hugs Susan

Sunday, 12 July 2009
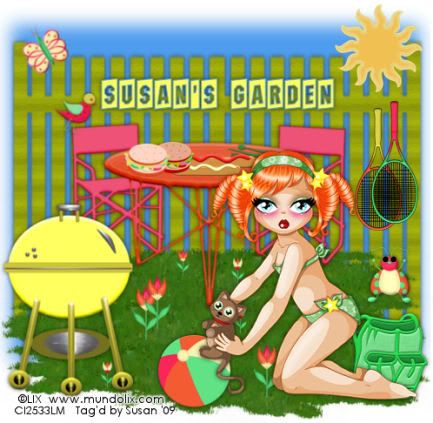
My Garden BBQ
This tutorial was written on July 12th 2009 by Susan aka Hippiedaze.
The idea for this tag is off my own head lol and any resemblance is purely coincidence.
General Knowledge of psp is required, tutorial was written in psp 9 but will work in other versions.
Supplies Needed
Tube of Choice, I used the artwork of Lix, you must have a proper license to use his work please visit CILM - HERE .
PTU Scrap Kit Used - 'One Summer Day' by Hippiedaze (me), you can purchase this kit from P4S - HERE.
No Template Used.
Mask Used - Vix Mask #133 by Vix - HERE.
Effects Used - Blur, Guassian Blur.
2nd Effect Used - Textured Effects, Woodgrain.
Standard Lawn Picture Tube (included with your psp program).
Font of Choice.
(open all supplies and save mask to psp folder before beginning)
Lets Start ....
Go to file in your psp tabs, select new and choose a white image whichever size you prefer to work with, i use 500x500 but select yours to suit yourself, click ok.
Take one of the table/chairs elements from the kit and paste as a new layer on your working canvas, resize as needed to suit your tag size and place in the middle, move up a little (you can reposition this later on).
Take one of the BBQ elements and paste this as a new layer, resize as needed and move to bottom left corner of your canvas, add a dropshadow.
Choose the hamburger and hot dog elements paste each as a new layer on your canvas, make sure your on the top layer lol, resize the elements as needed and place on the table.
Take the cutlery element and paste this as a new layer, resize as needed again and place on the table along with the food, i also used the deform tool on this element to 'flatten' the cutlery, simply click the deform tool then while holding your shift key down move the mouse to pull the nodes down and flatten.
Take one of the rucksack elements from the kit and paste this as a new layer on your canvas, resize as needed and place where you want it, dorpshadow this layer.
Now activate your bottom white layer, go to layers, select add new raster layer, now go to your picture tubes tool in psp, look for the lawn/grass tube and select this and click in your psp workspace, be sure to add the new raster layer or the tube will post on your background layer lol, click the tube and paste as many times as needed to fill the area you want for the 'grass'.
Take a flower element and paste as a new layer, resize as needed and place anywhere on the grass, duplicate this as many times as you want and place your flowers around the garden, i resized some flowers smaller than others.
Now paste your tube as a new layer,resize as needed and place where you want it on your tag, add a dropshadow to the tube layer.
Activate the bottom white layer, paste a paper from the kit as a new layer, go to layers and select load mask from disc, look for the mask you saved at the start (vix mask #133) select this and make sure the following settings are checked:-
Fit to canvas - checked Source luminace - checked Invert transparency - unchecked .... Hide Mask - checked. go to layers, merge group & you can use the deform tool to resize to suit your tag.
Still on the mask layer go to effects, select texture and look for the 'woodgrain' effect, choose this and your fence should now look a bit like wood lol, add a dropshadow to this layer.
Activate the bottom layer once more and take your Rectangle preset shape, choose a colour in your background tab and leave foreground tab to null, draw out a large rectangle on your canvas just a little bigger than the mask layer, go to adjust, select blur, guassian blur and set to 10.00, click ok.
Activate the top layer of your canvas now and add a few other elements of your choice, i used the bird, butterfly ,ladybug & Tennis Bat and place them around my tag, remember to resize each element and add the dropshadow.
Add your name in your chosen font and place on the fence, add a dropshadow to your name.
Add artist info & copyright info.
Save as jpeg or .png.
and we're done i think lol.
Thanks for trying my tutorial and i hope you enjoyed it.
would love to see your results,
hippiedaze@hotmail.com
Lil Update, New Tuts & A Thank You
Good Morning Everyone,
Its not so nice here today lol a bit dull and already had some rain with more to follow later in the day, I have a busy one too and have to go out a few times so it is typical the weathers not good eh lol.
Anyways, I hope your all enjoying my latest kits and first cu template, I have another new kit goin on sale today called 'Groovy Festival' yip is another bright and colourful kit with a funky feel to it lol, as a certain someone said hehe 'suits me' and your sooo right girl :P
Also that certain someone mentioned above is none other than the truly awesome Shani aka Wicked Princess, shes such a gem and has been busy tutting from my kits & templates again, Ive added new tut links to Shani's Tut blog to the list on the right over >>>>>>> so be sure to check out her awesome blog, with so many fantastic tuts,
Thanks Ya Shani, love them all girl
Have a fab Sunday everyone
hugs Susan :)
Saturday, 11 July 2009
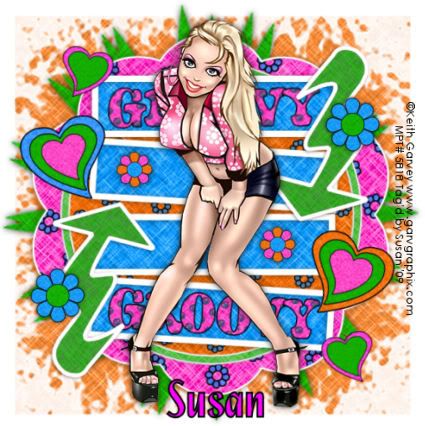
Just Groovy
This tutorial was written on June 23rd 2009 by Susan aka Hippiedaze.
The idea for this tag is off my own head lol and any resemblance is purely coincidence.
General Knowledge of psp is required, tutorial was written in psp 9 but will work in other versions.
Supplies Needed
Tube of Choice, I used the artwork of Keith Garvey, you must have a proper license to use his work please visit MPT - HERE .
Scrap Kit Used - 'Give Peace A Chance' by Hippiedaze (me) d/l from 4shared - HERE .
Template Used - Hippiedaze Template #022 by Me which you can d/l from 4shared - HERE .
2 Masks of Choice.
Plugin Used - Eye Candy 4000, Gradient Glow.
Font of Choice.
(Open all supplies and save mask to psp folder before you begin)
Lets Get Started
Open the template, hit shift & d on your keyboard,this pastes the template as new image, close the original template. Delete the info layer.
Go to image and choose resize, select width & height to 90%, smartsize checked and make sure the tab resize all layers is checked, click ok.
Click on the bottom white layer and go to image, select canvas size then choose 500x500, click ok, if there is any transparent image showing grab your floodfill tool and fill with white.
Activate the Large Flower Shape layer, go to selections, select all, select float, select defloat then paste a paper from the kit as a new layer, resize if needed then go to selections again and select invert then hit delete on your keyboard, back to selections and select none, delete the original layer.
Add a gradient glow by going to effects, select eye candy 4000, gradient glow, use the following settings :-
Glow Width - 3.00 .... Soft Corners - 25 .... Overall Opacity - 100 .... Colour - White, click ok.
Repeat that step for the layers named merged rectangles using a different paper & delete the original layer. But no need to add the gradient glow to this layer.
Activate the Circle layer, go to selections, select all, select float, select defloat then paste a paper from the kit as a new layer, resize if needed then go to selections again and select invert then hit delete on your keyboard, back to selections and select none, delete the original layer.
Add a gradient glow by going to effects, select eye candy 4000, gradient glow, use the following settings :-
Glow Width - 3.00 .... Soft Corners - 25 .... Overall Opacity - 100 .... Colour - White, click ok, i also added a dropshadow to this layer.
Do this again on the Circle frame layer & add a gradient glow by going to effects, select eye candy 4000, gradient glow, use the following settings :-
Glow Width - 3.00 .... Soft Corners - 25 .... Overall Opacity - 100 .... Colour - Black ... move the colour slider half way along to the centre to give a bolder glow effect. click ok.
I left the merged rectangle frames layer white and added the same gradient glow to this layer.
Activate the arrow 1 layer, grab your magic wand and click inside the grey area so the marching ants are blinking, open a paper of choice in your psp workspace and minimise, go to your foreground tab in the colour palette and click, choose pattern from the tabs at the top and look for the paper that you just minimised in the pattern tabs, select this then take your floodfill tool and click inside the marching ants to fill with paper, go to selections and select none then activate the arrow layer and add a dropshadow.
Repeat the above step for the arrow 2 layer.
Activate your bottom white layer, paste a paper of your choice as a new layer, go to layers, select load mask from disc and choose the 1st mask that you saved at the start, a starburst mask will work well on this layer and use the following settings :-
Fit to canvas - checked .... Source luminace - checked .... Invert transparency - unchecked .... Hide Mask - checked, click ok, go to layers, merge group.
Activate the bottom white layer again and paste another paper from the kit as a new layer, repeat the step you just did for the mask using the 2nd mask you saved at the start, an edge mask will work for this layer.
Add any other elements from the kit that you wish, place each element as a new layer and resize as needed, elements should be resized smartsize, add a dropshadow to each layer or add the gradient glow to some elements.
Activate the rectangles layer and paste a wordart from the kit as a new layer, resize as needed and take your deform tool to rotate it just slightly so its in line with the rectangle, go to layers, select duplicate and move this so its sitting inside another rectangle, use the deform tool here again to line it with the rectangle.
Activate your top layer now and paste tube as a new layer, resize as needed then place where you like it and add a dropshadow.
Crop or resize your tag now if you want to or didnt at the start.
Add your name, artist info and copyright info.
Save as jpeg or .png.
and we're done i think lol.
Thanks for trying my tutorial and i hope you enjoyed it
would love to see your results,
hippiedaze@hotmail.com
Subscribe to:
Posts (Atom)


