This tutorial was written on July 25th 2009 by Susan aka Hippiedaze.
The idea for this tag is off my own head, any resemblance is purely coincidence.
Easy to follow tut.
General Knowledge of psp is required, tutorial was written in psp 9 but will work in other versions.
Supplies Needed
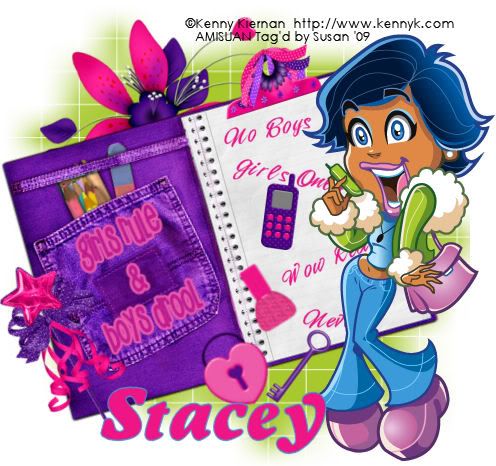
Tube of Choice, I used the artwork of Kenny Kiernan, you must have a proper license to use his work please visit AMI - HERE.
PTU Scrap Kit Used - 'Girls Rule/Boys Drool' by Stacey @ Staceys Designs and you can purchase thos awesome kit at Scrap Heaven Boutique - HERE.
Mask Used - WSL Mask #84 by Chelle @ Wee Scots Lass Creations - HERE.
Effects Used - Eye Candy 4000, Gradient Glow.
Fonts of Choice.
(Open all supplies and save mask to psp folder before you begin)
Lets Get Started
Open a new canvas in your psp workspace by going to file, select new, choose white 500x500 and click ok.
Take the notebook element and paste as a new layer on your canvas, place in the centre then go to image, select rotate and rotate to the left by 25, click ok.
Choose a font and colour of your choice and type out some phrases for the notebook, once you have a phrase you like go to layers and choose convert to raster layer, use new layers for each phrase and then with the deform tool rotate slightly & place on the note page.
Using the same font in a bigger size type out another phrase you like, convert to raster layer and rotate a little then place this on the opposite note page, I added a small gradient glow to this text layer, go to effects, select eye candy 4000, gradient glow and the following settings :-
Glow Width - 3.00 .... Soft Corners - 25 .... Overall Opacity - 100 .... Colour - to match your tube, click ok.
Take your tube and paste this as a new layer, resize around 80% smartsize and place to the right side of your tag (see mine).
Take the nail polish element and place as a new layer, resize down till its to your liking and place this where you want it also rotate slightly using the deform tool.
Take the heart lock element and place this on your canvas as a new layer, resize as needed and place where you want it, you can rotate if you wish.
Take the key element and place this as a new layer, again resize, rotate & place where you like it.
Take the mobile phone element and place as a new layer, resize and place where you like.
I also used the magic wand element and the clip but you can choose which elements you want to decorate the tag with, paste each element as a new layer and resize to your liking.
Activate the bottom layer of your canvas and choose a doodle from the kit, paste as a new layer and resize as needed then place it so its showing from behind the notebook at the top left side.
Activate the bottom white layer again, i added a new layer and filled it green to match my tube but you can paste a paper from the kit as a new layer then go to layers, select load mask from disc then in the box that pops up look for the mask you saved at the start (WSL Mask #84) use the following settings to add the mask:-
Fit to canvas - checked .... Source luminace - checked .... Invert transparency - unchecked .... Hide Mask - checked, click ok, go to layers, merge group, use your deform tool to stretch the mask layer out a little till its how you want it & showing around your tag.
Crop or resize your tag now if you want to or didnt at the start but leave enough room for your name lol.
Add your name, artist info and copyright info.
Save as jpeg or .png.
and we're done i think lol.
Thanks for trying my tutorial and i hope you enjoyed it
would love to see your results,
hippiedaze@hotmail.com .
Saturday 25 July 2009
The Girl Rules
Posted by hippiedaze at 08:07
Labels: Tutorials - PTU
Subscribe to:
Post Comments (Atom)


0 comments:
Post a Comment