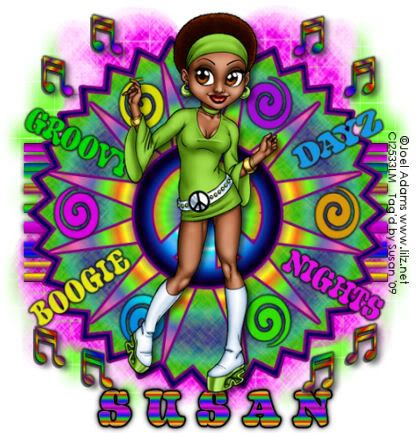
This tutorial was written on 16th June 2009 by Susan aka Hippiedaze.
The idea for this tag is off my own head lol and any resemblance is purely coincidence.
General Knowledge of psp is required, tutorial was written in psp 9 but will work in other versions
Supplies Needed
Tube of Choice I used the artwork of Joel Adams, you will need a proper license to use his work which you can get by visiting CILM - HERE.
No Scrap Kit Used.
Papers Used - Hippiedaze Paper Pack 011 by me which you can download from 4shared - HERE .
No Elements Used.
Template Used - Hippiedaze Template 021 by me which again can be downloaded from 4shared - HERE .
Masks Used - WSL Mask #99 & WSL Mask #84 by Chelle @ Wee Scots Lass Creations - HERE .
Plugin Used - Eye Candy 4000, Gradient Glow.
Font of Choice.
(open all supplies and place mask into your psp folder before we start)
Lets Get Started
Open the template, hit shift & d on your keyboard,this pastes the template as new image, close the original template. Delete info layer. Go to image, select resize and choose 90%, make sure smartsize is checked and resize all layers checked, click ok.
My template has a white background layer so no need to add one, activate this layer and go to image again and select canvas size and choose 500x500, click ok.
Activate the Pink Star layer, go to selections, select all, select float, select defloat then paste one of the papers from the pack as a new layer, resize a little if you want to then go to selections and select invert then hit delete on your keyboard, go to selections again and select none, you can delete the original layer now.
Repeat the step for the layers named Bars, Music Notes, Spiked Star & Peace Sign, use different papers for each layer and delete the original layers as you work.
Now go to effects and select eye candy 4000, gradient glow, use the following settings on all the above layers :-
Glow Width - 3.00 .... Soft Corners - 25 .... Overall Opacitiy - 100 .... Colour - Of Your Choice, move the slider half way along the the middle to give a bolder glow. Click ok.
Activate the Large Dark Star layer, go to adjust, select brightness/contrast and move the brightness slider to the right a bit so the layer is lighter, click ok, go to adjust again, select hue/saturation/lightness, select colourise and choose a colour of choice, click ok.
Add the same gradient glow as above to this layer.
Activate the Swirl 1 layer, on these layer i choose to colourise each a different colour but have added plain papers if you wish to use them for the swirls, work through each swirl layer and delete the originals if your using the papers.
Add the gradient glow to all swirl layers but change colour to black and move the 2nd colour slider all the way back to the left so the glow is thinner than the other layers.
Activate the Groovy Word layer, go to selections, select all, select float, select defloat then paste a plain paper from the pack as a new layer, go to selections and select invert then hit delete on the keyboard, go back to selections again and select none, delete the original layer and add the lighter gradient glow to the new layer you just created.
Repeat that step for the other 3 word layers using different papers from the pack, delete the original layers and add the same glow to each layer.
Activate the bottom white layer now, paste a paper of choice from the pack as a new layer, go to layers, select load mask from disc and use the first mask you saved at the start (WSL Mask #99) use the following settings :-
Fit to canvas - checked .... Source luminace - checked .... Invert transparency - unchecked.... Hide Mask - checked. Click ok, go to layers, merge group. Click ok, I duplicated this layer and then mirrored.
Activate the bottom white layer again and go to layers, select add new raster layer, grab your floodfill tool and choose a bright colour then click canvas to fill, now go to layers again, select load mask from disc and find the 2nd mask you saved at the start (WSL Mask #84) repeat the settings for the mask from the step above but do not duplicate this layer, i used the deform tool to stretch it out a bit.
Activate the top layer of your canvas and paste your tube as a new layer, resize as needed and place in centre or where you like it, add a dropshadow.
I didnt use any other elements on this tag.
Crop or resize if you wish to now.
Add your name, I used a paper for my name fill and added the bolder glow settings, also added a dropshadow to my name.
Add artist info & copyright info.
Save as jpeg or .png. and we're done lol.
Thanks for trying my tutorial and i hope you enjoyed it would love to see your results,
hippiedaze@hotmail.com
Tuesday 30 June 2009
Boogie Nights
Posted by hippiedaze at 01:08
Labels: Tutorials - FTU
Subscribe to:
Post Comments (Atom)


0 comments:
Post a Comment